In this workshop, you will be introduced to the basics of Adobe Acrobat Forms (for PC). By the end of this workshop you will be able to:
- Select original documents and create PDF files
- Create forms from PDF documents
- Use Adobe LiveCycle Designer
- Add form fields
- Edit form fields
- Enable usage rights in Adobe Reader
- Distribute forms using Outlook
- Distribute forms using your personal email (or save and email later)
- Receive completed forms and house data sets
- Receive and send back completed forms (Recipients)
You must have Adobe Acrobat Professional 8.0 to follow along with this workshop on your own computer. If you do not have Adobe Acrobat Professional you may want to complete the workshop in a lab on campus that has Professional installed.
Open Adobe Acrobat Professional (i.e. the newest, version 8)
Select Create PDF

Choose your file from the locations available. Your file may already be a .pdf and in that case you will open up your .pdf file in Adobe Professional.
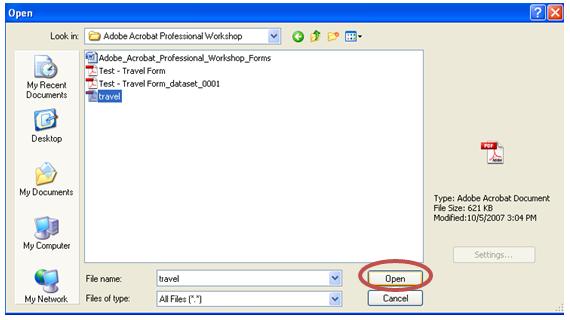
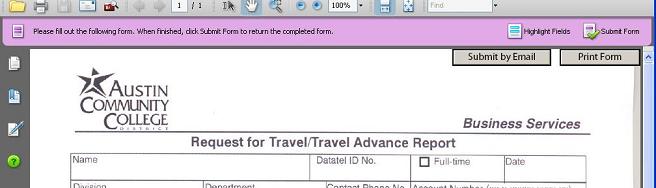
Make sure that your file is not already created as a form; you want to work with the original file. If your file is already a form it will look like the image below. Make sure that you are working with the original file and not one that has already been modified.
Create Forms from PDF Documents
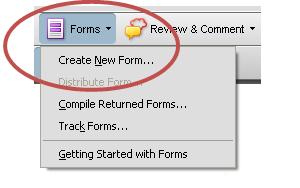
Select the drop down menu for Forms located on the Task toolbar.
Select Create New Form (*You may start here if you are using a pre-made template in Adobe or if your file is an original .pdf file*).
A new window appears and you will select what type of form you would like to create, such as “Start with an electronic document”.
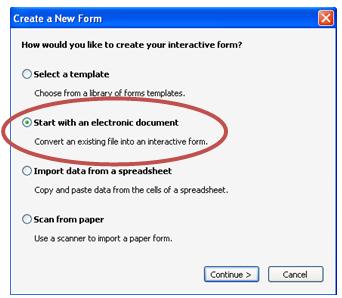
Select Continue…
Next, you will locate the document that you would like to turn into a form; it may be the current document you have open or a new document.
If it is the current document, then select “Use the current document”. If you have to import the file (if the file is different than the file in which you are currently working), then select “Import file from file system”.
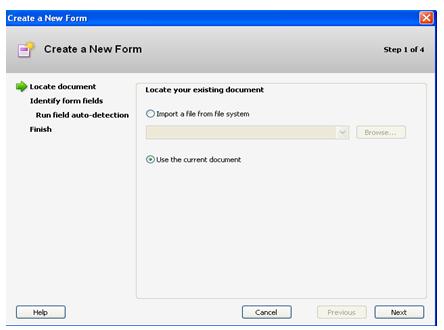
Once you have selected your existing document, then select Next to move on to Identify form fields.
This screen enables you to identify forms fields on your existing document, either “Run auto field detection” or “Place fields by hand”. Recommended: “Place Fields by Hand” because you then are able to create your own fields. The auto detect function is nice, but it sometimes places fields in odd places or in places that should not be considered a field for the form*.

Select Run Auto Field Detection and then select Next.
If you run the auto field detection and receive an error that reads “No new form field annotations were detected”, then select OK and then Next. You are finished and will be able to edit your form in Adobe LiveCycle Designer. (*If you had selected “Place fields by Hand” and Next you would be prompted to finish and edit your form as well*).

Adobe LiveCycle Designer
Adobe LiveCycle Designer is a software application that creates forms from Adobe Acrobat Professional documents.
Adobe LiveCycle Designer will open automatically on your computer (PC) once you have specified which .pdf document you would like to turn into a form (a dynamic .pdf document).
A New Form Assistant window will appear (this is the last window to complete before editing your form) and will prompt you to add buttons: one button for your form to be returned to a designated email address and one button for users to print the document and submit it manually. You do not have to choose either button if you wish to inform the users in a different manner, such as having the users print out and send in the documents. The buttons are very efficient and you are able to move them around on the document to any location that you see fit.
If you select “Add an email button” make sure to enter your return email address in order for recipients’ completed forms to be emailed back to you.
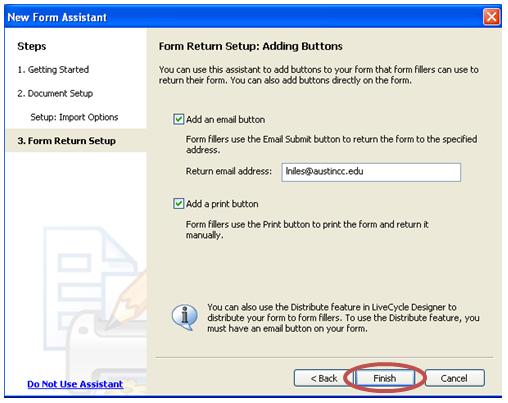
Then select Finish…
The document will convert into a form and your new form will appear with the buttons on the top right hand corner of the window.
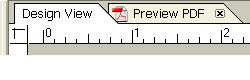
There are two views in Designer: a design view, where you will design your form and a Preview PDF view, where you will preview your form.
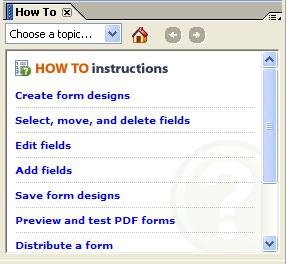
There is a How to section in the upper right hand corner of your window (and the Help function located on menu bar) to help you if you would like to try out new things on your own; however, you can email me if you have any questions ([email protected]).
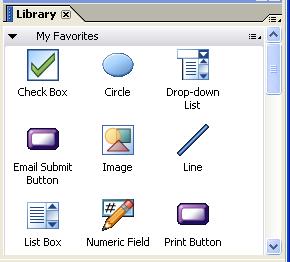
There is a Library located in the lower right of your window. In the library you will find the different field options (Favorites, Standard, Custom, and Barcodes) that you may add to your form (these items are also located under Insert on the Menu bar) (i.e. text box, drop down list, radio button, date/time, numeric field, text field, etc.).
Add Form Fields
To add a form field, either double-click on the field (in the Library window) or drag and drop it onto your form. You will be able to move the form field around once it is on your document. When you select the field in Design View you will notice that there are four dots around the edges. To resize the field you can select a dot with your cursor and press down your cursor and pull to make the field larger or smaller. You may also delete the field if it is not the field that you were hoping to use.
The date/time field is quite nice in that it actually gives you a drop down menu that turns into a calendar when you preview it. I would suggest testing out different fields and seeing their functions before choosing your fields quickly.
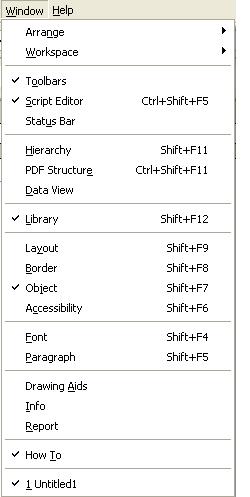
If you do not see the “How to” section or the “Library” section, select Window on your menu toolbar and then select the “window” that is missing (i.e. library, How to, Object, etc.).
Edit Form Fields
Once you add your first field and preview it, you may notice that there is a large sunken box…this may not be very pleasing to the eye, so you will want to go back to designer view, select your field and then select the Object Tab in the bottom right hand corner of your window (these items are also located under Windows on the Menu bar). You will select the drop down menu beside “Appearance” and select None. If this is a new form and you want the box to appear, you can select a different appearance and preview it to make sure it is what you want on your form.
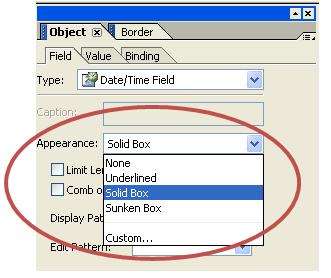
In the object window you will also be able to indicate a display pattern or give your field a custom appearance. This may be beneficial when you want someone to enter a specific number such as a student ID number. You also have the ability in the object window to make sure that recipients insert a valid email address – first you select the Email Address field under Custom in the Library, then you add it to your document, then select value (make sure the email address field is highlighted) – you will notice that there is already a generic message so if anyone adds an invalid email the form will not accept it…they must place a valid email in the field.
Certain manipulations of the fields may be defined in the Object window. either under Field, Value, or Binding.
When you have finished adding fields to your form and are ready to deliver your form to recipients, select File and Save As. Save the file as a .pdf document (a static .pdf).
Re-open the file in Adobe Acrobat Professional.
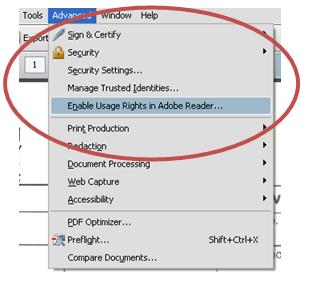
Enable Usage Rights in Adobe Reader
*IMPORTANT* Make sure to Enable Usage Rights as soon as the file is saved and opened in Adobe Acrobat Professional. This option enables clients with only Adobe Reader to save their documents to their local hard drive.
Once selected a window appears with information about the usage rights in Adobe Reader.
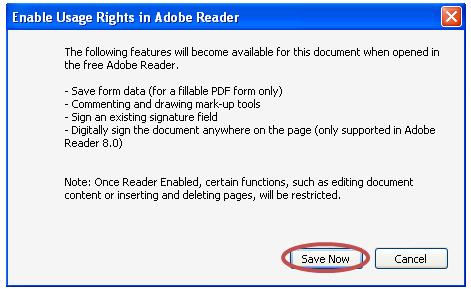
Select Save Now (If recipients use a Mac and only have Preview they should be able to save the form to their local hard drive).
Distribute Forms using Outlook
Next, select the Distribute button in Adobe Acrobat Professional, then select Forms > Distribute Forms.
![]()
The Adobe Distribute Form Assistant opens and guides you through the distribution process. You will be prompted to complete the Forms Distribution Options (i.e. send now or save and send later (later in this tutorial)).
When using your outlook mail select “Send now via email” and use your email application on your computer (if you are not using your office computer you may want to follow the steps on the next page, distributing forms using your personal email). You may want to email the form to yourself in order to make sure that the form is the way you want it (it may also be important to save the form and view later which would lend itself to follow the steps on the next page).
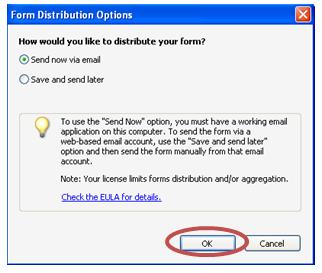
Once you have chosen how you would like to distribute select OK.
A Distribute Form window appears and requires you to fill out how you would like to distribute the form. First, you will enter the address for where you would like the forms to be returned.
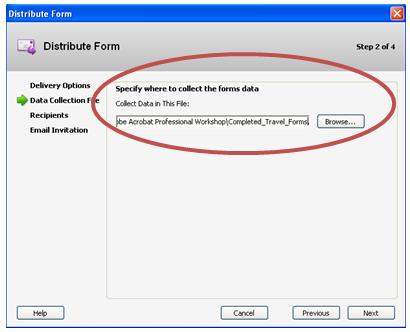
Select Next once you have specified where your data will be collected (you may have multiple files for different data, therefore you would create new data sets to help organize the completed forms).
You will then be asked to provide the email addresses of the recipients for the form (you may send it to yourself first to test out the distribution feature). You can enter them by hand (separate the names with semicolons or Enter) or select the Address Book to select names currently stored in your Outlook Address Book.
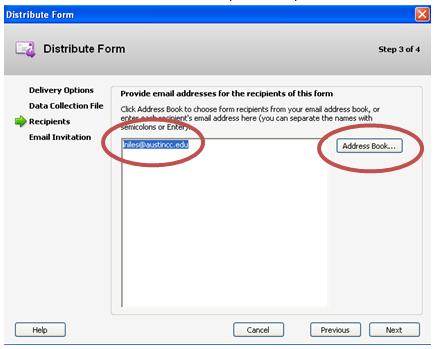
To add multiple names from your address book, double click on the names and they will appear in the To>>function in the lower left of the window (separated by semicolons).
Once you have entered all of the email addresses you will select Next.
You will then be prompted to complete the Email Invitation. You may enter a new subject line and enter the message for your form (you may also add a text file by selecting “Select Text File”). The program automatically gives you a generic subject heading and body, but you may change the subject heading and body.

Once you have completed your email invitation and are ready to distribute your form, select Done.
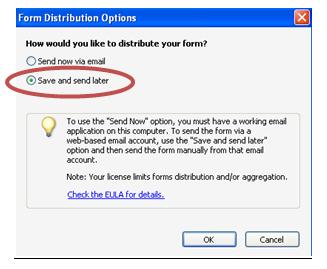
Distribute Forms using your Personal Email
When using your personal email, or if you would like to save the form and email later, select “Save and send later”…then select OK.
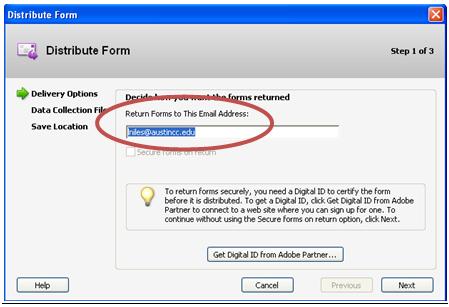
A Distribute Form window appears and requires you to fill out how you would like to distribute the form. First, you will enter the address where you would like the forms to be returned.
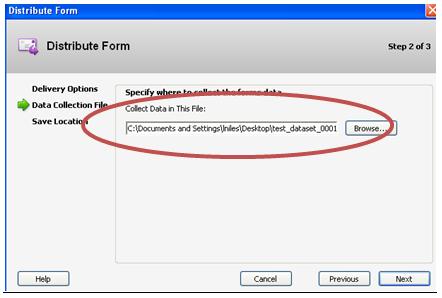
Specify where you would like to collect the data from the returned forms. The program may give you a generic location, but you may change the name so you can find the data from your returned forms (you may also change where your file will be kept on your computer – to do this select browse).
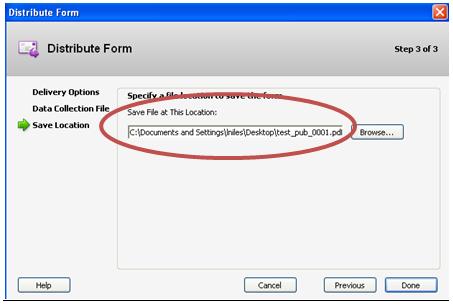
Specify where you would like to save the file in order for you to send it later (from your personal email or different email account other than Outlook). You may save it in the same folder where you have saved the data set or you may want to create a forms folder that houses the forms that you will or have sent to recipients. The program may give you a generic location, but you may change the name so you can find the forms (you may also change where your file will be kept on your computer – to do this select browse).
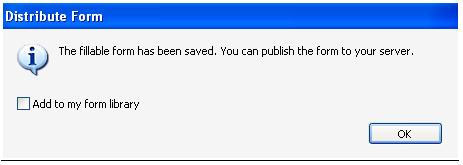
The final distribute form window will appear to let you know that your form has been saved and is ready to email to recipients whenever you are ready.
Receiving Completed Forms and Housing Data Sets
The email address chosen to receive the completed forms should then receive an email(s), “Form Returned: Email Subject” (the subject you entered when you sent the email), from the distribution list.
Make sure all Adobe applications are closed when opening the data set.
Double click the returned data set .pdf (the attachment to the email).
You will then be prompted to add completed form to data set when the pop-up window appears on your screen (if you do not see a pop-up window prompting you to save the data, then close the Adobe application and make sure that all other instances of Adobe are closed on your system).
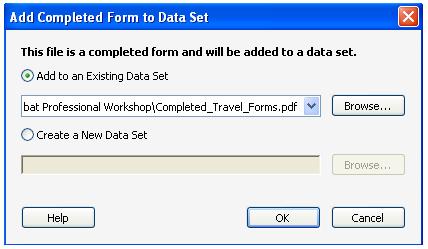
This is the data set that you specified during the creation of your form.
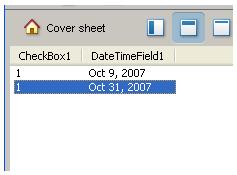
Once OK has been pressed the data will be added to the pre-existing data set and you will be able to select the different data sets and see the forms that were filled out (i.e. Two forms with two fields completed).
Make sure to save your data set once you have added new forms (if you do not save then the new data set added may not be stored in the same data set).
Receiving and Sending Back Completed Forms (Recipients)
Recipients who save and complete forms do not have to have Adobe Professional IF the “Usage Rights for Adobe Reader” have been enabled. They will be able to save the document to their local hard drive and then open the document and complete it using Adobe Reader (PC – they may need the newest version 8) or Preview (Mac). They can print the form out when completed to have their own copy of the data, they can save the data to their local hard drive, and/or they can submit the completed form via email back to you (through their preferred email client).
If the recipient chooses to send via email (works ONLY with Adobe Professional), then they can select the “Submit by Email”, otherwise they will have to indicate what option they choose and then select OK.
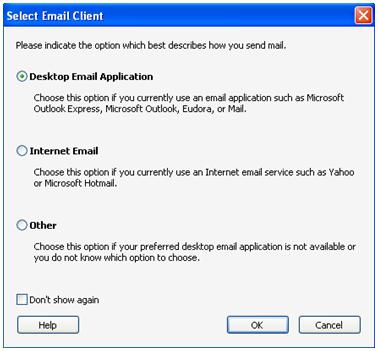
An outgoing message will pop-up notifying the sender that the form has been sent or that the sender does not have a default mail application and the form must be sent manually (i.e. through their Internet email, etc.).
Tags: Adobe Acrobat
Back to Top